Edge Mask Sharpening
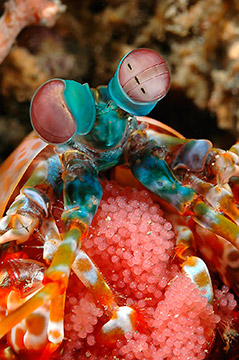
Sharpening is a key post-production step when finishing your images. An Edge mask is a simple layer that accentuates just the edges in your photo to selectively sharpen it. With it you can make shots like this mantis shrimp jump off the screen and look great when printed. Here’s how to make it jump.
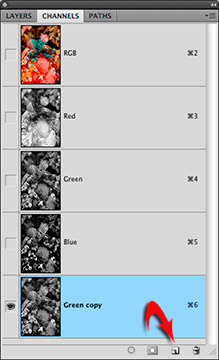
Figure 1: The Green channel of this image provides more overall contrast, greater luminosity detail and the least amount of noise compared to the others making it the ideal channel to help create an edge sharpening mask. The duplicate channel, created by dragging the Green channel down to the “ Create New Channel” icon at the bottom of the panel is automatically named “copy” and is highlighted.
First navigate to the Channels panel and locate the channel containing the most contrast. To examine the image on a channel by channel basis simply click on the name of individual channels to evaluate which has the best contrast. Most often, the red or green channels work best. When it’s a toss up, I choose green which normally contains greater luminosity detail and less noise making it a better choice for overall contrast.
Next, duplicate your selected channel by dragging it down to the New Channel icon at the bottom of the panel. (Figure 1)
With the duplicate channel highlighted go to Filter > Stylize> Find Edges. The Find Edges command uses the channel information and now presents your image as line art with black and gray edge outlines on a white background. You want the opposite, so press Command+I or Control+I on the keyboard to invert it so you have white outlines on a black background. You’ll use this modified channel to generate a sharpening mask in the upcoming steps. This mask will be used to apply sharpening along the edge lines of critical importance-the white lines, where it is needed most. Black regions remain unsharpened while gray regions are partially sharpened. (Figure 2.1, 2.2)
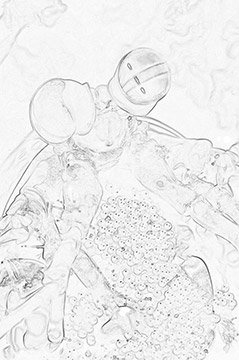
Figure 2.1: The Find Edges filter generates a fast and accurate mask that’s used to apply sharpening where an image needs it most; on the edges.
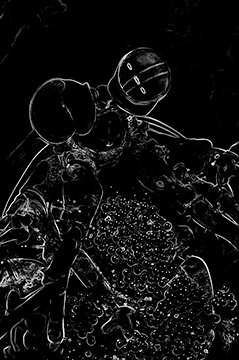
Figure 2.2: To effectively use this channel mask for sharpening, it was inverted and contrast increased using the Levels command. Black areas suppress final sharpening, gray regions allow partial sharpening while white lines allow the full strength of your final sharpening.
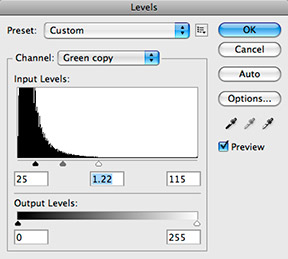
Additional edge detail inside the mask can be extracted to improve sharpening by boosting the channel’s overall contrast using the Levels command. Choose Image > Adjustments > Levels, then work the sliders below the histogram to improve contrast. While adjusting the sliders, if unwanted elements other than prominent lines and detail are reintroduced in the mantis shrimp or on the background they can be cleaned up at the end. When you are happy with your adjustments press OK to commit the change. (Figure 2.3)
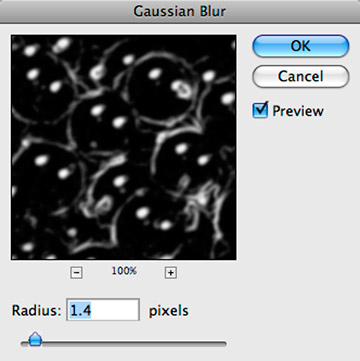
Figure 3: A small Radius setting helps to soften harsh edge detail in the enhanced mask so harsh halos that may appear due to sharpening process can be effectively suppressed.
Next, use the Gaussian Blur filter to slightly soften and smooth out the enhanced mask to avoid any harsh halos that would normally occur when applying sharpening to the image in the final steps of this process. Go to Filter>Blur>Gaussian Blur and enter an appropriate radius setting, usually between .1 and 3 for most images. (Figure 3)
Next, go to Select>All to select the mask in its entirety. Then go to Edit>Copy to copy it.
At this stage, you don’t need the duplicate channel mask anymore so drag it to the Trash icon in the panel.
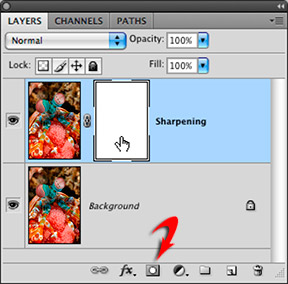
Now, switch to the Layers panel, and quickly duplicate the background image pressing Command+J or Control+J. To stay organized you can rename it “sharpening.”
Next, add a layer mask by clicking the Layer Mask icon at the bottom of the panel. (Figure 4)
Once visible, Alt/Option click on the Layer Mask thumbnail. This turns your image white and gives you a clean canvas to paste your black and white channel mask created earlier on. Do that going to Edit>Paste.
Then, get rid of the selection by pressing Select>Deselect.
Next, click on the image layer thumbnail and apply your sharpening going to Filter > Sharpen > Unsharp Mask.
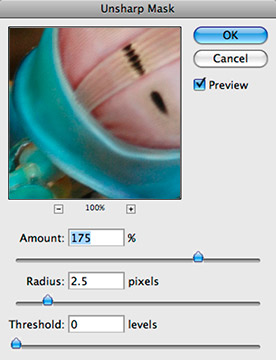
Figure 4.1: When setting the sliders inside the Unsharp Mask dialogue, focus only on edge detail as most of the sharpening you see in the dialogue preview window will be suppressed by the mask. Concentrate on what the image looks like onscreen.
Apply settings appropriate for your image. For many high resolution photos, a radius setting around 1.5 is an excellent starting point. From there you can fine tune this slider along with the others until you get a result you are happy with. Here a Radius of 2.5 and Amount of 175 really define the edge lines of the mantis shrimp.
Toggling the preview box, notice how the sharpness is only applied to the areas of the mask that are white and gray, while the black areas like the background remain for the most part unsharpened. Don’t be concerned with the overall sharpening effect visible in the preview area of the dialogue box. Most of the sharpening there is suppressed by the mask. When your finished, click OK (Figure 4.1)
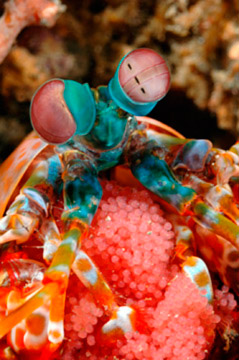
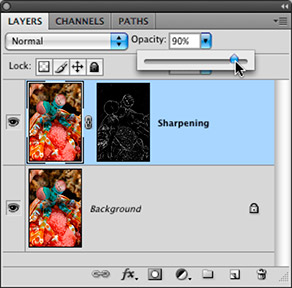
Toggle the visibility of the duplicate layer to check the results. If the sharpening is a little heavy, fade it down using the opacity slider. (Figure 4.2)
Earlier, I mentioned refining the mask to clean up areas where unwanted sharpening occurred. Here’s how.
Hold down the Alt/Option key and click on the mask to bring it up in the Document window. Use the Brush tool (B) and paint with black at 100% opacity to brush away unwanted sharpening. Here, sharpening in the background and parts of the shrimp were toned down or eliminated.
Bring the photo back into view by clicking on the image layer and toggle the sharpened layers visibility to see what a difference the edge sharpening has made.
Thanks to the Find Edges filter and some creative work inside the edge mask, the mantis shrimp jump off the page with noticeable crispness and no need for complicated and unnatural selections.


You must log in to post a comment.