Remove Hot Spots
by Doug Sloss
Strobes allow underwater shooters to illuminate the marine world and create images full of color. And yet, while strobes play an important role in underwater photography they can also cause problems. Hotspots, those patches of white that lack highlight detail, can occasionally appear in an image where an underwater flash was used. This usually occurs when shooting highly reflective subject matter like sharks. Unfortunately, these hotspots are tricky to tone down when trying to finalize an image for print or display in a digital gallery.

Before - Problematic hot spots caused by strobe flash blow out the snout and lower jaw of this black tip shark. With no detail in the blown out highlight regions, this areas of a photo will print paper white.

After - Creative use of the retouching tools can restore otherwise destroyed regions in a photo and save the shot. The recreated areas also help enhance the final print or viewing of the image.
Try this two-step trick the next time you want to eliminate a hotspot from one of your winners. Utilize the power of Photoshop’s retouching tools to paint away your problem areas, add texture, and achieve professional-looking results that are both believable and look great!
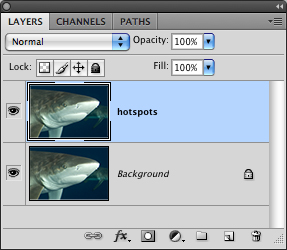
Open an image you would like to correct inside Photoshop, hold down the Command~Option keys and then press the letter J on the keyboard (PC: Ctrl~Alt~J). This keyboard shortcut creates a duplicate layer of your image and allows you to simultaneously name it. In the dialogue box that appears, choose an appropriate name and click OK. Here I’ve named mine “hotspots” (Figure 1)

Figure 2 - Work on the duplicate layer to protect your original file and name it to stay organized. To keep file size down, CS3 and CS4 users can make this 2 step correction using new layers instead of duplicating the image.
Apply your corrections to the duplicate layer and leave your original file untouched. (Figure 2)
Step 1: In the example here, a layer base of color must first be applied to the hotspot before adding texture back into the blown out portions of the image. Without a good base of color that matches the surrounding areas, your final edits won’t look credible. To do that, select the Clone Stamp tool (S) from the toolbox and choose a soft-edged brush from the Brush Preset picker. In the Options bar change the Effect Mode to Darken, and lower the Brush Opacity to around 20%. These settings properly set the clone stamp up to help make your corrections look realistic. (Figure 3)
Begin by sampling the colors in the image that surround the hotspot. Place the cursor over some pixels that contain suitable color to fill the hotspot, hold down the Option key (PC: Alt key) and click once with the mouse to sample the pixels below the cursor. Next, position the cursor inside the hotspot and start clicking with the mouse to “paint away” any imperfections. By setting the Mode to Darken, the brush affects only the areas lighter than the sampled pixels enabling you to correct just the problem area inside your hotspot. A lowered brush opacity gives you greater control over your edits, and allows you to paint with greater accuracy to produce an even base of color. Resample the surrounding pixels often, varying the size of the brush when needed for precise results. Try dragging the cursor in short sweeping motions every so often to help make the corrections appear more natural. Stop when you have laid an even foundation of color that matches the surrounding tones outside the hotspot.
On images where the tones are only a little hot, a few touch ups with the clone tool is all that’s needed to make an image look great. On more challenging images where the hotspot is completely blown out and the area lacks the highlight detail, you need to do more than just fill in missing color. Sometimes you must also create texture for your previous repair work to appear credible.
Step 2: To create texture for your colored-in area, use the Healing Brush. In the Options bar leave the Mode set to Normal and the Source set to Sampled. (Figure 4) Like the Clone tool, work with a soft-edged brush and use it to sample desired areas of texture just outside the hotspot zone. Hold down the Option key (PC: Alt key), click once to sample some pixels and move your cursor to the area you want to edit. Begin painting by clicking with the mouse. You can also click and drag the cursor to create small short strokes. This action adds texture to your previous work and helps make your corrections look as organic as possible.

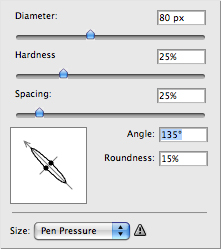
Figure 5 - Use a thin brush for realistic texture and change the angle frequently for seamless edits.
For maximum believability, access the Brush Preset picker and alter the angle and roundness of your healing brush as you work. You’ll discover a thin, angled brush helps create realistic texture and makes your edits blend seamlessly together. (Figure 5)
During the repair process resample often, alter the brush angle when needed, and work slowly to achieve the best-looking results. After working a few photos in your shark collection you’ll be correcting hotspots with ease using Photoshop’s retouching tools and some of your own creativity!


You must log in to post a comment.